 English
 عربى
عربى Español
 русский
 中文简体
中文简体


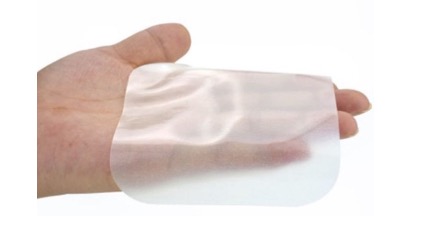
Hydrocolloid dressings are commonly used wound care products. They absorb small amounts of exudate, keep the wound moist, and promote healing. However, many people easily overlook a crucial step when using them: cutting. An improperly sized dressing can waste material or even hinder healing. Mastering the correct cutting method allows this small dressing to achieve its maximum value.
Why is it important to pay attention to the detail of cutting?
If the dressing is too large, extending too far beyond the wound edge, the edges are prone to curling up and sticking to clothing or sheets, thus negating its protective function. If the dressing is too small, it won't cover the entire wound, exposing the edges and making them susceptible to friction and contamination. If the dressing has gaps or openings in the middle, it will disrupt the sealed environment, significantly reducing its moisturizing effect. Another often overlooked problem is that improperly prepared cut dressing edges can develop burrs that can scratch the newly formed skin when changing it.
Preparations before cutting :
Prepare hydrocolloid dressings, sterile scissors, a ruler, and a marker. Wash your hands thoroughly, and you may wear sterile gloves. Work in a well-lit area to avoid cutting off sections. If the wound requires ointment, apply it first before applying the dressing. Observe the shape and location of the wound beforehand, and plan your cutting method before you begin.
The correct way to measure wound size :
Measure the length and width of the wound using a sterile ruler. For round or oval wounds, take the longest and widest measurements. For irregular shapes, gently press a sterile gauze against the wound to trace its outline before cutting. Do not pull on the skin during measurement to avoid cutting the dressing too small. Record the measurements. The dressing should be 2 to 3 centimeters larger than the wound; this allowance is for proper fit around the edges.
Cutting techniques for different types of wounds :
Regular circular or oval wounds are the simplest. After measuring the diameter, add 2 to 3 centimeters as the diameter of the dressing. Cut out a circular dressing, and you can trim the edges slightly into a curve to avoid right angles that are prone to curling.
For long, narrow wounds such as surgical incisions or cuts, cut them into strips. Make sure to round the corners, as right angles are most prone to curling during movement. The strip should be at least 2 centimeters longer than the wound, ensuring both ends are completely covered.
Wounds around joints are the most difficult to treat. For wounds on fingers, toes, or wrists, dressings that are too wide can restrict movement. You can cut a bow shape, narrow in the middle and wide at both ends, to conform to the contours of the bent joint. Alternatively, you can cut triangular notches on both sides of the dressing, like a craft project, allowing it to stretch and adapt to joint movement.
For irregularly shaped wounds such as bedsores or ulcers, you can first gently imprint the wound outline with sterile gauze, then draw lines on the back of the dressing according to the outline, and cut along the lines. This method provides the best fit and saves the most material.
Details about the cut edge:
When cutting the dressing, use sharp scissors to make a clean, single cut to avoid creating burrs from repeated trimming. After cutting, gently run your finger along the edges; if there are any noticeable burrs, trim them. Do not cut the dressing into too many small pieces, as this will affect the overall fixation.
Methods for applying fixative dressings :
After applying the dressing, securing it is equally important. For areas with little movement, the self-adhesive properties of the dressing are sufficient. For areas prone to detachment, such as fingers and toes, a self-adhesive elastic bandage can be used for outer securing. This type of bandage is breathable, doesn't attract hair, and won't pull on the skin when removed. When bandaging, wrap it from the fingertip towards the proximal end, with a tightness that allows one finger to be inserted. It doesn't need to be wrapped too thickly; one layer is enough to secure the dressing.
Removal techniques during dressing changes :
When changing dressings, if you find the edges have curled up, gently peel them back in the direction of curling. If they are stuck on tightly, do not tear them off. You can moisten the edges with saline solution and wait a few minutes before peeling them off. When removing the dressing, observe the wound for any abnormal redness, swelling, increased exudation, or odor; these are all warning signs.
Cutting hydrocolloid dressings may seem like a small matter, but it's a crucial step affecting healing outcomes. Accurate measurement, proper cutting, and correct fixation ensure this protective layer truly functions, aiding in successful wound healing. For more information on Innomed®Hydrocolloid Dressing, refer to the previous articles. If you have customized needs, you are welcome to contact us; you wholeheartedly. At long-term medical, we transform this data by innovating and developing products that make life easier for those who need loving care.
Editor: kiki Jia


